

Have you ever been in the mood for a quick, fun, and delicious treat that requires little effort but still impresses everyone around you? If you’re nodding yes, then you’ve come to the right place! Imagine cookies that not only taste amazing but also look like spooky spider webs—perfect for Halloween, themed parties, or just to impress friends and family. Well, we have a solution for you: Spider Web Cookie Stamp Cookies! In this post, we’ll show you how to make this delightful and easy recipe in just 10 minutes.
Table of Contents
Overview
Spider Web Cookie Stamp Cookies Easy Recipe is a game-changer when it comes to preparing treats in a flash. This recipe is simple, fast, and requires minimal ingredients, making it perfect for bakers of all skill levels. Whether you’re a newbie in the kitchen or a seasoned pro, this fun recipe offers a creative twist to your usual cookie-making routine. You can create beautiful spider-web designs with a cookie stamp that will dazzle your guests. Best of all? It takes less than 10 minutes to prepare the dough and get them baking.
Time required: 10 minutes (preparation time) Difficulty level: Easy Perfect for: Halloween, themed parties, or as a fun baking project for kids
Essential Ingredients
The best part about making these Spider Web Cookie Stamp Cookies is that you likely already have most of the ingredients in your pantry. Let’s take a closer look at what you’ll need:
- Butter (1/2 cup): The key to creating soft and chewy cookies. Unsalted butter is ideal, but if you only have salted butter, just adjust the salt later in the recipe.
- Sugar (1/2 cup): Granulated sugar is used to add sweetness to the dough and help the cookies spread perfectly.
- All-purpose flour (1 1/2 cups): The base of our cookie dough. It gives structure to your cookies.
- Baking powder (1 tsp): A leavening agent that makes your cookies soft and fluffy.
- Vanilla extract (1 tsp): Adds flavor and makes the cookies smell delicious as they bake.
- Egg (1): This helps bind the ingredients together and gives structure to the cookies.
- Chocolate (for spider web decoration): Dark or white chocolate will work, depending on your preference. You can use a chocolate chip or bar, melted and piped into a spider web pattern.
Substitutions:
- You can use margarine instead of butter if you want a dairy-free version.
- If you prefer, you can substitute white sugar with brown sugar for a slightly different flavor.
- For gluten-free cookies, use a gluten-free flour blend that is suitable for baking.
- If you’re vegan, try a flax egg (1 tablespoon of ground flaxseed mixed with 2.5 tablespoons of water) instead of a regular egg.
Step-by-Step Instructions
Follow these easy steps to make your own Spider Web Cookie Stamp Cookies:
- Preheat your oven: Start by preheating your oven to 350°F (175°C). This will ensure that it’s nice and hot when your cookies are ready to bake!
- Prepare your cookie dough: In a large mixing bowl, cream together the softened butter and sugar until light and fluffy. You can do this using an electric mixer or a whisk if you’re feeling more hands-on. Once the mixture is smooth, add the egg and vanilla extract. Mix until fully combined.
- Add the dry ingredients: In a separate bowl, whisk together the flour and baking powder. Gradually add this to the butter-sugar mixture. Stir it until you get a soft dough. You may need to use your hands to knead the dough a bit, but it shouldn’t be too sticky.
- Roll out the dough: Take a small portion of dough (about 1 tablespoon per cookie) and roll it into a ball. Place the ball on a parchment-lined baking sheet. Press it down gently to flatten the cookie. You don’t want it too thin, or the design won’t hold.
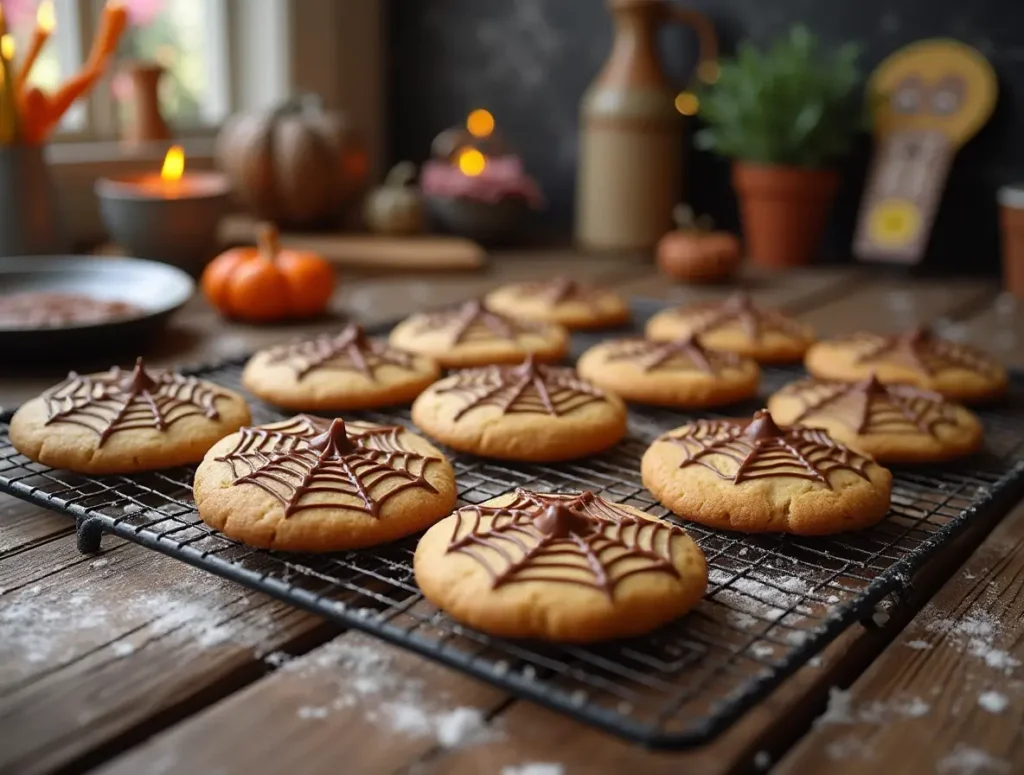
- Stamp the spider web design: Take a spider web cookie stamp (you can find these online or in most kitchenware stores) and press it gently onto the center of each cookie. This will create a beautiful spider web design that’s perfect for Halloween!
- Bake the cookies: Place the baking sheet in the oven and bake for 8-10 minutes, or until the edges of the cookies are lightly golden. Keep an eye on them, as baking times may vary depending on your oven.
- Cool down: Once the cookies are done, remove them from the oven and let them cool on a wire rack. This ensures they stay crisp and don’t lose their shape.
Assembly: Decorating with Chocolate
Now comes the fun part: decorating the cookies with a spider web design made out of chocolate!
- Melt the chocolate: Break up your chocolate into small pieces and melt it in a microwave-safe bowl in 20-second intervals, stirring in between, until it’s smooth. Alternatively, you can melt it using the double-boiler method.
- Pipe the web: Place the melted chocolate into a piping bag or a ziplock bag with the tip of the corner snipped off. Carefully pipe the chocolate in a spiral pattern on top of the stamped spider web design. Start from the center and work your way outward. Once you’ve got the web down, add small chocolate dots in the center to complete the look.
- Let it set: Allow the chocolate to set for a few minutes. You can pop the cookies into the fridge to speed up the process!
Storage and Make-Ahead Tips
- Storage: Store the cooled cookies in an airtight container at room temperature for up to 5 days. This helps them stay fresh and maintain their texture.
- Freezing: You can freeze the cookie dough for later use. Just wrap it tightly in plastic wrap and store it in a freezer bag. When ready to bake, allow the dough to thaw in the refrigerator before rolling and stamping.
- Chocolate Tips: If you don’t want to pipe the chocolate immediately after baking, you can store the cookies without the decoration and add the chocolate later when you’re ready to serve.
Recipe Variations
- Spider Web Brownie Cookies: For a richer treat, replace some of the flour with cocoa powder to create a chocolate cookie base. These are perfect for chocolate lovers!
- Spooky Eyes: Add a couple of edible candy eyes in the center of the web for a fun, creepy effect.
- Mini Spider Web Cookies: Make smaller, bite-sized versions of these cookies by rolling the dough into tiny balls, stamping them with the spider web, and baking them for 6-7 minutes.
Conclusion
Spider Web Cookie Stamp Cookies Easy Recipe is the perfect way to bring a spooky, fun touch to any occasion. In just 10 minutes, you can create beautifully designed cookies that everyone will love. Whether you’re baking for Halloween or just want to impress your friends and family with a quick treat, this recipe will become your go-to favorite. The simplicity, combined with the creativity of the spider web design, makes it a winner for bakers of all ages.
So grab your cookie stamp and get ready to bake some fun and delicious treats! Don’t forget to experiment with different designs and flavors to make the recipe your own.
FAQs
- Can I use a different type of chocolate for the web? Yes, you can use dark, milk, or white chocolate depending on your preference. You can even try flavored chocolates like mint or orange for a unique twist.
- How do I keep my cookies from spreading too much during baking? Make sure your dough is well-chilled before baking, as this will help the cookies keep their shape and prevent them from spreading too thin.
- Can I make these cookies gluten-free? Absolutely! You can substitute the all-purpose flour with a gluten-free flour blend to make these cookies suitable for those with gluten sensitivities.
- How do I store the cookies to keep them fresh? Store the cookies in an airtight container at room temperature for up to 5 days. If you’re not decorating them right away, you can keep the cookies un-decorated in a sealed container until you’re ready.
This easy recipe is the perfect way to create delicious, spider web-themed cookies without spending hours in the kitchen. Enjoy the process, and most importantly, enjoy the tasty treats!